If you’ve ever stood in a home improvement aisle, staring at rows of thin metal bars labeled “aluminium spacer bars,” you’ve probably wondered the same thing: Can I install these myself? As a supplier who’s spent the last eight years talking to DIYers, construction students, and handyman novices about these parts, I get it. They’re small, they look simple, and you’ve got a weekend and a set of basic tools—why not try? But let’s be real: I’ve seen too many people botch an installation because they skipped a small, critical step, and then they’re stuck calling a professional to fix it. My job isn’t to talk you out of DIY projects—it’s to give you the real, no-fluff breakdown of whether this is a project you can tackle, and what you need to know before you grab your drill. Aluminium Spacer Bar
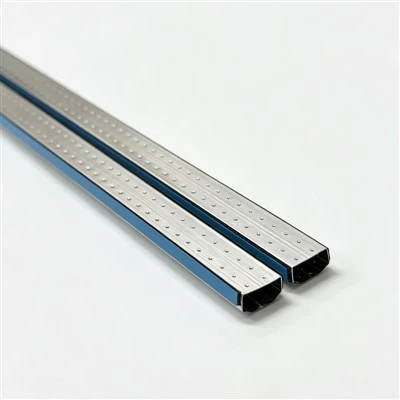
First, let’s get clear on what aluminium spacer bars actually do, because that’s the foundation. These aren’t just random strips of metal—they’re the unsung heroes of insulated glass units (IGUs), the double- or triple-pane glass you see on modern windows, patio doors, and even skylights. Their job is twofold: they hold the glass panes apart at an exact, consistent distance, and they create a sealed, dry space between the panes that stops moisture from getting in. If moisture gets trapped there, you get foggy windows, mold buildup, and eventually, seal failure that means you have to replace the whole unit. That’s why these bars aren’t like cutting a piece of wood to size—they have precision requirements that make or break the final result.
Now, the good news: Installing aluminium spacer bars is simpler than, say, rewiring a ceiling fan or tiling a shower. The barrier to entry is low, and if you’re comfortable with basic measuring and hand tools, you can absolutely do it. But here’s the catch: It’s not “no-skill” DIY. There are specific steps that require attention to detail, and one small mistake can turn a $50 set of spacer bars into a $500 mistake when you have to replace the IGU. Over the years, I’ve spoken to hundreds of customers who’ve come back to buy replacement bars not because they used the wrong product, but because they messed up the installation the first time. Let’s walk through what that process actually looks like, so you can decide if you’re ready for it.
First, let’s outline the tools and materials you’ll need, because this isn’t a project where you can wing it with a pair of scissors and a tape measure. You’ll need a miter saw (or a heavy-duty hacksaw if you don’t have a miter saw—no, regular scissors won’t cut it), a deburring tool or a piece of fine-grit sandpaper to smooth the cut ends, a silicone-based sealant specifically made for IGUs (not regular bathroom caulk—this is non-negotiable), a desiccant (that’s the little packet of drying agent that goes inside the spacer bar to absorb any moisture that might slip in, and it’s not optional), a utility knife, a measuring tape, and a pair of work gloves—aluminium edges are sharp, and you don’t want to cut your hand mid-project. If you have a crimping tool, that’s a bonus, but a pair of pliers works in a pinch for smaller jobs.
The first step is measuring, and this is where most DIYers go wrong. You need to measure the inner perimeter of your glass unit with extreme accuracy—down to the 1/32 of an inch, literally. If your spacer bar is even a hair too long, the glass won’t seat properly against the sealant, and you’ll have gaps where moisture can get in. If it’s too short, the seal will stretch too thin, and it will break under pressure from temperature changes. I always tell customers to measure twice, cut once—but here, measure three times. I’ve seen a guy cut a 24-inch bar when he needed 23 7/8, and by the time he got to the last corner, he had to re-cut all four bars because the gap was too big. Don’t be that guy.
Next, cutting the bars to size. Once you have your measurements, cut the bars at a 45-degree angle on each end—this is so the corners meet perfectly when you assemble the frame. If you cut at a wrong angle, the corners will have gaps, and again, that’s a leak waiting to happen. Once you cut them, you have to deburr the edges. Aluminium is a soft metal, so when you cut it, it leaves tiny, sharp burrs along the edges. If you don’t smooth those off, they’ll poke through the sealant and create tiny holes that let moisture in. I always keep a small file in my toolbag just for this step—takes 30 seconds, and it saves you from a huge headache later.
Then, the desiccant step. This is another part that’s easy to skip, but it’s critical. Before you assemble the frame, you have to pour or insert the desiccant into the inside of the spacer bar. Wait—you can’t just open the desiccant packet and dump it in? Yes, exactly. Most spacer bars are designed with a small, built-in channel for the desiccant, and you have to make sure the entire length of the bar is filled. If you leave a spot empty, moisture will build up there, and you’ll get fog. Some DIYers skip this because they think “it’s fine, there’s no way moisture will get in,” but temperature changes will cause air to move in and out of the IGU, and that air will have moisture. The desiccant is the only thing that stops that.
Once you have the desiccant in, you assemble the frame by crimping the corners together. If you don’t have a crimping tool, you can use pliers to gently bend the edges of the bar where the corners meet to hold them together. The key here is not to crimp too hard—aluminium is soft, and if you bend it too much, it will crack, and then you’ll have a broken frame. If the corners aren’t tight, you can use a small piece of sealant to hold them together temporarily before adding the final seal.
Finally, you attach the frame to the glass. You apply a thin, even bead of the IGU-specific sealant around the entire outer edge of the spacer bar, then press it firmly against the inner edge of the glass. You have to make sure there are no gaps, no air bubbles, and that the sealant is spread evenly. Too much sealant, and it will squeeze out into the gap between the glass and the bar, blocking the desiccant. Too little, and there’s a gap for moisture. This is where patience pays off—Rushing this step is how you end up with a foggy window a month later.
Now, let’s talk about when you should definitely not do this yourself. If you’re working on a large unit—like a window that’s 4 feet wide or bigger—this is way more than a weekend project. Larger units are heavier, more prone to bending, and even a tiny misalignment can cause the entire frame to warp, leading to seal failure. If you’re not comfortable working on ladders, or if you don’t have space to work on a flat, stable surface (you need that to keep the frame straight while the sealant dries), call a professional. If your windows are double-paned already and you’re replacing a broken bar as part of a repair, that’s a different scenario—wait, no, actually repairing existing IGUs is even trickier than installing new ones, because you have to remove the old seal without breaking the glass. For that, most DIYers end up breaking the glass, which is way more expensive than hiring a pro.
As a supplier, I’ve had customers come to me with horror stories: one guy cut his bars 2 inches too short, so when he installed them, the glass popped out in the middle of a rainstorm; another forgot the desiccant, and his window was foggy within two weeks. These aren’t people who are careless—they’re people who didn’t know the small, critical steps that make aluminium spacer bars work. That’s why I always include a step-by-step installation guide with every order, and I offer free video tutorials on my website. The guide isn’t designed to sell you more bars—it’s designed to make sure you get a result that works.
Wait, but let’s address the big question most people have: Is it cheaper to do it yourself? That’s a fair one. If you do it right, yes—you’ll save labor costs. But if you mess it up, you’ll spend more replacing the IGU than you would have paying a pro. Let’s do the math: A set of aluminium spacer bars for a standard double-pane window costs about $30–$50. A professional installation costs $150–$250. But if you mess up, replacing a double-pane IGU costs $200–$400, on top of the $50 you spent on the bars. So the breakeven point is when you’re confident you can follow all the steps exactly. If you’re even a little unsure, the pro is worth the extra cash.
Another thing to consider: aluminium spacer bars vs. other types, like vinyl or stainless steel. Aluminium is the most common for IGUs because it’s durable, lightweight, and easy to work with—perfect for DIYers. Vinyl bars are softer and easier to cut, but they don’t hold up as well to extreme temperatures, and stainless steel is more expensive and harder to cut. So if you decide to DIY, aluminium is the right choice, which is why most suppliers (including me) stock it for that exact purpose.
Now, let’s get into some science to back this up, because I’m a supplier, not just a salesperson— I care about how these parts actually function. The gap between the panes of glass in an IGU is called the “air gap,” and it’s usually 12–16 millimeters. The aluminium spacer bar maintains this gap, and the sealant around it is a secondary barrier against heat transfer too, which is why IGUs are more energy-efficient than single-pane windows. If your spacer bar is the wrong length, the air gap isn’t consistent, and that reduces the energy efficiency of your window, which means higher heating and cooling bills. That’s a long-term cost that many DIYers don’t think about—you’re not just installing a bar, you’re maintaining the energy efficiency of your home.
I always tell customers to start small if they’re testing this. Don’t try to replace a big living room window first—try a small bathroom window, 18×24 inches, with a simple rectangular frame. That’s a manageable size, the tools are easy to handle, and if you make a mistake, the cost is low. Once you nail that, you can move on to bigger projects.
Let’s recap the key points to make this easy: Can you install aluminium spacer bars by yourself? Yes—if you have basic hand tools, can follow instructions carefully, and are working on a small to medium-sized window. The critical steps are measuring accurately, cutting at 45-degree angles, deburring the edges, adding desiccant, and applying the sealant evenly. If you’re working on a large unit, uncomfortable with precise measurements, or repairing an existing IGU, hire a professional.

As a supplier, I’m here to support you, whether you’re a DIYer testing your skills or a professional working on a big project. I can provide high-quality aluminium spacer bars in custom sizes, detailed installation guides, and technical advice every step of the way. If you’re ready to get the right parts for your project, don’t hesitate to reach out to discuss your needs and get a quote tailored to your specific job.
Aluminium Spacer Bar References:
- International Association of Home Inspectors. Insulated Glass Unit Best Practices for Installation and Repair.
- Window and Door Manufacturers Association. Specification Guide for Spacer Bar Materials in Insulated Glass Units.
- ASTM International. Standard Test Method for Determining Moisture Vapor Transmission Rate of Materials Used in Insulated Glass.
Renqiu City Xinjian Metal Products Co., Ltd.
Renqiu City Xinjian Metal Products Co., Ltd. is one of the most professional aluminium spacer bar manufacturers and suppliers in China. With abundant experience, we warmly welcome you to wholesale customized aluminium spacer bar from our factory. If you have any enquiry about free sample, please feel free to email us.
Address: Caicun Dajie Village, Changfeng Town, Renqiu City, Hebei Province China
E-mail: melody@xinjianmetal.com
WebSite: https://www.xjglassspacer.com/
